For some testing purposes I needed to install SAP Customer Checkout Manager locally on my computer (running on Windows 10). As I initially thought it will be quite easy, but came across lots of different topics during installation and use of it, i thought it would be nice to write a short summary as reference for myself some time in the future or probably for people who want to save their time.
First of all you need to download the needed software.
- SAP Customer Checkout Manager (CCOM) from SAP Downloads
- Java JDK (i’ve chosen SAPMachine 11) – do not install SAPMachine 17 as it is not yet supported by CCOM: also from SAP Downloads
- Apache Tomcat 9 (choose the installer for Windows) – do not use Apache Tomcat 10 (or higher) as I had some issues during installation of CCOM in regards of securitymanager in Tomcat 10.
So here are already 2 lessons learned:
- definitely use SAPMachine 11 and not 17 (as it won’t let you install CCOM)
- use Apache Tomcat 9 (as there are some issues caused by Tomcat 10)
After installation of SAP Machine 11, install Tomcat 9. To avoid getting some errors during installation of CCOM you have to edit the context.xml in your Tomcat 9 installation directory/conf to setup the caching and maximum Cache Size:
<Context>

    <WatchedResource>WEB-INF/web.xml</WatchedResource>
    <WatchedResource>WEB-INF/tomcat-web.xml</WatchedResource>
    <WatchedResource>${catalina.base}/conf/web.xml</WatchedResource>

    <Resources
        cachingAllowed="true"
        cacheMaxSize="100000"
    />

</Context>
The red part has to be added. You will also need native support for CCOM, in detail the „tcnative-1.dll“. You can download it directly from oracle and put the file into the Tomcat 9 installation directory/bin
After you have done those preparations you should be able to install CCOM like a charm by putting the ccos.war – File (or however it is called) into the webapps folder in your Tomcat 9 Installations directory.
If you used ccos.war as installation file a ccos folder in webapps will be created and CCOM will be installed. Based on your system performance it could take some minutes until installation is done. After the installation is finished you can access the setup of CCOM visiting the following address: http://localhost:8080/ccos (port 8080 if you kept the standard settings during Tomcat installation.
As some Apps in CCOM need more memory you have to increase the java heap size for Tomcat. You can do this by navigating to the /bin Folder in your Tomcat 9 Installation Folder and execute Tomcat9w.exe. Just navigate the to the Java Tab and increase the maximum memory pool, see here:
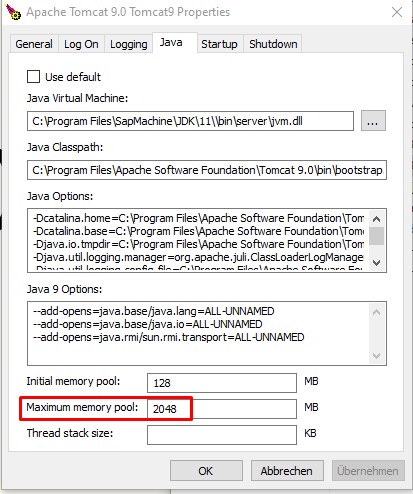
After you setup the maximum memory pool restart the Tomcat 9 service (you can do it directly in the General tab) and CCOM should run on your Windows 10 machine like a charm.