Categories
Allgemein

Willkommen!

Willkommen auf blumma.com

Hier entsteht in Kürze eine Sammlung von diversen Themen mit den Schwerpunkten SAP Business One, dem dazu passenden Integration Framework (B1if) und Shopware 5.

Warum dieser Blog? Worum wird es hauptsächlich gehen?

Unser Unternehmen ist über die letzten Jahre stark gewachsen und gleichzeitig steigt auch die Komplexität des Geschäfts und der manuelle Aufwand sollte, so gut wie möglich, reduziert werden um Zeit für Kernthemen zu haben. Dank der Shopware 5 API und dem SAP Business One Integration Frameworks (B1if) lassen sich die Systeme relativ einfach verbinden. Ein paar Prozesse bzw. Anbindungen habe ich hier in der letzten Zeit umgesetzt und da die Use-Cases (vor allem bei B1if Themen) doch recht spärlich im Internet vertreten sind, möchte ich in diesem Blog Interessierten Denkanstösse geben, aber auch Probleme bzw. Herausforderungen aufzeigen über die ich bei diversen Umsetzungen gestolpert bin.

Categories
Allgemein

Reolink RTSP Stream displayed as Mosaic using VLC

After more than one year of using the Reolink Windows Application to display more than one Reolink Stream at the same time, I noticed a few negative side effects. If you have it running constantly the streams get laggy (means it is sometimes up to 5-10 seconds time shifted, or the objects in the stream are not moving fluent anymore). In my opinion or feeling it is, because the video stream is transfered not locally – it goes through the Reolink cloud or at least over the servers at Reolink.

So I was investigating a solution where the stream is consumed only through the LAN. Reolink supports consuming RTSP Streams (check your camera settings – for some cameras it was switched on, for others not) and so my idea was to use VLC as player. You can find directly at Reolink a short guide how to consume the RTSP Stream: click here

But this is only a single camera stream and for the surveillance (live) view it is not really that nice like the Reolink Application for Windows itself. But VLC offers the possibility to create a mosaic view of multiple streams. You only need to create a „script“, which is effectively a .vlm file which you call at start of VLC.

Here’s my .vlm File for displaying 4 Reolink Cameras at once at a display resolution of 1920×1080 (so Full HD):

# Background options
new   bg broadcast enabled
# bg just plain black background jpg image
setup bg input     "C:\vlc\bg.jpg"
setup bg option image-duration=-1
setup bg output #transcode{sfilter=mosaic{width=1920,height=1080,cols=2,rows=2,position=1,order="1,2,3,4",keep-aspect-ratio=enabled,keep-picture=1,mosaic-align=5},vcodec=mp4v,vb=2000,fps=15}:duplicate{dst=display}

# Input options
new   1 broadcast enabled
# RTSP string for Reolink cameras
setup 1 input "rtsp://admin:password@XX.XX.X.XXX:554/h265Preview_01_main"
setup 1 option dshow-size="960x540"
setup 1 output #duplicate{dst=mosaic-bridge{id=1,width=960,height=540},select=video,dst=bridge-out{id=0}}

new   2 broadcast enabled
setup 2 input "rtsp://admin:password@XX.XX.X.XXX:554/h265Preview_01_main"
setup 2 option dshow-size="960x540"
setup 2 output #duplicate{dst=mosaic-bridge{id=2,width=960,height=540},select=video,dst=bridge-out{id=1}}

new   3 broadcast enabled
setup 3 input "rtsp://admin:password@XX.XX.X.XXX:554/h265Preview_01_main"
setup 3 option dshow-size="960x540"
setup 3 output #duplicate{dst=mosaic-bridge{id=3,width=960,height=540},select=video,dst=bridge-out{id=2}}

new   4 broadcast enabled
setup 4 input "rtsp://admin:password@XX.XX.X.XXX:554/h265Preview_01_main"
setup 4 option dshow-size="960x540"
setup 4 output #duplicate{dst=mosaic-bridge{id=4,width=960,height=540},select=video,dst=bridge-out{id=3}}

# Launch everything
control bg play
control 1 play
control 2 play
control 3 play
control 4 play

Just replace the „password“ with your password and the XX.XX.X.XXX with the IP Addresses or your cameras and save the .vlm with a meaningful name (I named it mosaic.vlm)

For a full size background I use a white .jpg file which i stored locally in C:\vlc\ Folder.

Just run VLC using command line:
„C:\Program Files\VideoLAN\VLC\vlc.exe“ –vlm-conf=“C:\vlc\mosaic.vlm“ –fullscreen

For more comfort i finally created a Batch File (.bat) for running the command with a double click. Until now it works like a charm without any lags. Only CPU usage is quite high with around 50%, but as nothing else is running on this computer I do not care that much.
Categories
SAP Customer Checkout

SAP Customer Checkout Error Message „Hardware keygeneration library not found“

Since SAP Customer Checkout 2.0 Feature Pack 08 all installations of your POS (Point of Sales) need an assignment of a License.

As I came across the issue that if you upgrade manually from an older version to a most recent version of SAP Customer Checkout (short: CCO) the licensing does not work like it should, i’ve analysed why. The Hardware Key in your CCO Installation stays empty and in the console you have following error message:

ERROR com.sap.scco.ap.license.HardwareKeyGeneratorFactory - Hardware key generation library not found
java.lang.UnsatisfiedLinkError: C:\SapCustomerCheckout\cco\lib\slicjlib.dll: Can't find dependent libraries
at java.base/java.lang.ClassLoader$NativeLibrary.load0(Native Method)
at java.base/java.lang.ClassLoader$NativeLibrary.load(ClassLoader.java:2442)
at java.base/java.lang.ClassLoader$NativeLibrary.loadLibrary(ClassLoader.java:2498)
at java.base/java.lang.ClassLoader.loadLibrary0(ClassLoader.java:2694)
at java.base/java.lang.ClassLoader.loadLibrary(ClassLoader.java:2659)
at java.base/java.lang.Runtime.loadLibrary0(Runtime.java:830)
at java.base/java.lang.System.loadLibrary(System.java:1873)
at com.sap.scco.ap.license.HardwareKeyGeneratorFactory.createHardwareKeyGenerator(HardwareKeyGeneratorFactory.java:27)
at com.sap.scco.ap.pos.service.impl.LicensePosServiceImpl.(LicensePosServiceImpl.java:61)
at java.base/jdk.internal.reflect.NativeConstructorAccessorImpl.newInstance0(Native Method)
at java.base/jdk.internal.reflect.NativeConstructorAccessorImpl.newInstance(NativeConstructorAccessorImpl.java:62)
at java.base/jdk.internal.reflect.DelegatingConstructorAccessorImpl.newInstance(DelegatingConstructorAccessorImpl.java:45)
at java.base/java.lang.reflect.Constructor.newInstance(Constructor.java:490)
at com.sap.scco.ap.pos.service.ServiceFactory.constructInstance(ServiceFactory.java:250)
at com.sap.scco.ap.pos.service.ServiceFactory.getOrCreateServiceInstance(ServiceFactory.java:206)
at com.sap.scco.ap.pos.service.ServiceFactory.getOrCreateServiceInstance(ServiceFactory.java:197)
at com.sap.scco.ap.pos.util.HouseKeeping.performLicenseCheck(HouseKeeping.java:131)
at com.sap.scco.ap.pos.util.HouseKeeping.tryCleanup(HouseKeeping.java:96)
at com.sap.scco.ap.pos.util.HouseKeeping.run(HouseKeeping.java:60)
at java.base/java.lang.Thread.run(Thread.java:829)

After some research (actually directly in some SAP Presentation: see here) I found out that due to manual upgrade of CCO some dependencies were not installed automatically. CCO needs Microsoft Visual C++ 2010 SP1 Redistributable Package (x64) to be installed that the slicjlib.dll in directory \cco\lib is working. If you install the Package (you can download it directly from microsoft.com) Hardware Key can be generated by CCO and so also licensing works like a charm.

Categories
Allgemein SAP Customer Checkout

Install SAP Customer Checkout Manager on your local computer

For some testing purposes I needed to install SAP Customer Checkout Manager locally on my computer (running on Windows 10). As I initially thought it will be quite easy, but came across lots of different topics during installation and use of it, i thought it would be nice to write a short summary as reference for myself some time in the future or probably for people who want to save their time.

First of all you need to download the needed software.

  • SAP Customer Checkout Manager (CCOM) from SAP Downloads
  • Java JDK (i’ve chosen SAPMachine 11) – do not install SAPMachine 17 as it is not yet supported by CCOM: also from SAP Downloads
  • Apache Tomcat 9 (choose the installer for Windows) – do not use Apache Tomcat 10 (or higher) as I had some issues during installation of CCOM in regards of securitymanager in Tomcat 10.

So here are already 2 lessons learned:

  1. definitely use SAPMachine 11 and not 17 (as it won’t let you install CCOM)
  2. use Apache Tomcat 9 (as there are some issues caused by Tomcat 10)

After installation of SAP Machine 11, install Tomcat 9. To avoid getting some errors during installation of CCOM you have to edit the context.xml in your Tomcat 9 installation directory/conf to setup the caching and maximum Cache Size:

<Context>

    <WatchedResource>WEB-INF/web.xml</WatchedResource>
    <WatchedResource>WEB-INF/tomcat-web.xml</WatchedResource>
    <WatchedResource>${catalina.base}/conf/web.xml</WatchedResource>
	
    <Resources
        cachingAllowed="true"
        cacheMaxSize="100000"
    />

</Context>

The red part has to be added. You will also need native support for CCOM, in detail the „tcnative-1.dll“. You can download it directly from oracle and put the file into the Tomcat 9 installation directory/bin

After you have done those preparations you should be able to install CCOM like a charm by putting the ccos.war – File (or however it is called) into the webapps folder in your Tomcat 9 Installations directory.

If you used ccos.war as installation file a ccos folder in webapps will be created and CCOM will be installed. Based on your system performance it could take some minutes until installation is done. After the installation is finished you can access the setup of CCOM visiting the following address: http://localhost:8080/ccos (port 8080 if you kept the standard settings during Tomcat installation.

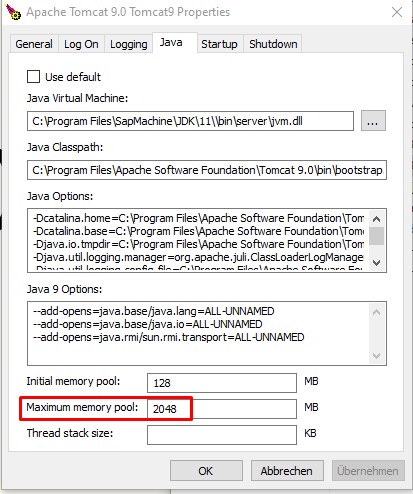
As some Apps in CCOM need more memory you have to increase the java heap size for Tomcat. You can do this by navigating to the /bin Folder in your Tomcat 9 Installation Folder and execute Tomcat9w.exe. Just navigate the to the Java Tab and increase the maximum memory pool, see here:

After you setup the maximum memory pool restart the Tomcat 9 service (you can do it directly in the General tab) and CCOM should run on your Windows 10 machine like a charm.